
.jpg)
.jpg)
.jpg)
NOTE: This is a collection of information and links collected over the years that might provide useful information. A Safer Company LLC does not guarantee, endorse or approve any of these links or their scripts. Use these links to other websites at your own risk.
Notice: Undefined variable: message in /hermes/walnacweb03/walnacweb03af/b1896/as.asaferco/webdesign/Templates/code/dir_listing_enhanced.php on line 67
Notice: Undefined variable: message in /hermes/walnacweb03/walnacweb03af/b1896/as.asaferco/webdesign/Templates/code/dir_listing_enhanced.php on line 72
Warning: Use of undefined constant r - assumed 'r' (this will throw an Error in a future version of PHP) in /hermes/walnacweb03/walnacweb03af/b1896/as.asaferco/code/F_get_page_title_Enh.php on line 28
Notice: Undefined variable: print_file_data in /hermes/walnacweb03/walnacweb03af/b1896/as.asaferco/webdesign/Templates/code/dir_listing_enhanced.php on line 127
Warning: Use of undefined constant r - assumed 'r' (this will throw an Error in a future version of PHP) in /hermes/walnacweb03/walnacweb03af/b1896/as.asaferco/code/F_get_page_title_Enh.php on line 28
Warning: Use of undefined constant r - assumed 'r' (this will throw an Error in a future version of PHP) in /hermes/walnacweb03/walnacweb03af/b1896/as.asaferco/code/F_get_page_title_Enh.php on line 28
Warning: Use of undefined constant r - assumed 'r' (this will throw an Error in a future version of PHP) in /hermes/walnacweb03/walnacweb03af/b1896/as.asaferco/code/F_get_page_title_Enh.php on line 28
Warning: Use of undefined constant r - assumed 'r' (this will throw an Error in a future version of PHP) in /hermes/walnacweb03/walnacweb03af/b1896/as.asaferco/code/F_get_page_title_Enh.php on line 28
Warning: Use of undefined constant r - assumed 'r' (this will throw an Error in a future version of PHP) in /hermes/walnacweb03/walnacweb03af/b1896/as.asaferco/code/F_get_page_title_Enh.php on line 28
Warning: Use of undefined constant r - assumed 'r' (this will throw an Error in a future version of PHP) in /hermes/walnacweb03/walnacweb03af/b1896/as.asaferco/code/F_get_page_title_Enh.php on line 28
Warning: Use of undefined constant r - assumed 'r' (this will throw an Error in a future version of PHP) in /hermes/walnacweb03/walnacweb03af/b1896/as.asaferco/code/F_get_page_title_Enh.php on line 28
Warning: Use of undefined constant r - assumed 'r' (this will throw an Error in a future version of PHP) in /hermes/walnacweb03/walnacweb03af/b1896/as.asaferco/code/F_get_page_title_Enh.php on line 28
Warning: Use of undefined constant r - assumed 'r' (this will throw an Error in a future version of PHP) in /hermes/walnacweb03/walnacweb03af/b1896/as.asaferco/code/F_get_page_title_Enh.php on line 28
Warning: Use of undefined constant r - assumed 'r' (this will throw an Error in a future version of PHP) in /hermes/walnacweb03/walnacweb03af/b1896/as.asaferco/code/F_get_page_title_Enh.php on line 28
Warning: Use of undefined constant r - assumed 'r' (this will throw an Error in a future version of PHP) in /hermes/walnacweb03/walnacweb03af/b1896/as.asaferco/code/F_get_page_title_Enh.php on line 28
Warning: Use of undefined constant r - assumed 'r' (this will throw an Error in a future version of PHP) in /hermes/walnacweb03/walnacweb03af/b1896/as.asaferco/code/F_get_page_title_Enh.php on line 28
Warning: Use of undefined constant r - assumed 'r' (this will throw an Error in a future version of PHP) in /hermes/walnacweb03/walnacweb03af/b1896/as.asaferco/code/F_get_page_title_Enh.php on line 28
Warning: Use of undefined constant r - assumed 'r' (this will throw an Error in a future version of PHP) in /hermes/walnacweb03/walnacweb03af/b1896/as.asaferco/code/F_get_page_title_Enh.php on line 28
Warning: Use of undefined constant r - assumed 'r' (this will throw an Error in a future version of PHP) in /hermes/walnacweb03/walnacweb03af/b1896/as.asaferco/code/F_get_page_title_Enh.php on line 28
Warning: Use of undefined constant r - assumed 'r' (this will throw an Error in a future version of PHP) in /hermes/walnacweb03/walnacweb03af/b1896/as.asaferco/code/F_get_page_title_Enh.php on line 28
Warning: Use of undefined constant r - assumed 'r' (this will throw an Error in a future version of PHP) in /hermes/walnacweb03/walnacweb03af/b1896/as.asaferco/code/F_get_page_title_Enh.php on line 28
Warning: Use of undefined constant r - assumed 'r' (this will throw an Error in a future version of PHP) in /hermes/walnacweb03/walnacweb03af/b1896/as.asaferco/code/F_get_page_title_Enh.php on line 28
Warning: Use of undefined constant r - assumed 'r' (this will throw an Error in a future version of PHP) in /hermes/walnacweb03/walnacweb03af/b1896/as.asaferco/code/F_get_page_title_Enh.php on line 28
Warning: Use of undefined constant r - assumed 'r' (this will throw an Error in a future version of PHP) in /hermes/walnacweb03/walnacweb03af/b1896/as.asaferco/code/F_get_page_title_Enh.php on line 28
Warning: Use of undefined constant r - assumed 'r' (this will throw an Error in a future version of PHP) in /hermes/walnacweb03/walnacweb03af/b1896/as.asaferco/code/F_get_page_title_Enh.php on line 28
Warning: Use of undefined constant r - assumed 'r' (this will throw an Error in a future version of PHP) in /hermes/walnacweb03/walnacweb03af/b1896/as.asaferco/code/F_get_page_title_Enh.php on line 28
Warning: Use of undefined constant r - assumed 'r' (this will throw an Error in a future version of PHP) in /hermes/walnacweb03/walnacweb03af/b1896/as.asaferco/code/F_get_page_title_Enh.php on line 28
Notice: Undefined variable: print_folder_data in /hermes/walnacweb03/walnacweb03af/b1896/as.asaferco/webdesign/Templates/code/dir_listing_enhanced.php on line 160
Notice: Undefined variable: message in /hermes/walnacweb03/walnacweb03af/b1896/as.asaferco/webdesign/Templates/code/WebDesign_toc.php on line 12
- Photoshop Draw curves with the Pen Tool
- Creating a Search Button
- Create a Website Page Layout
- Photoshop Creating a Logo
- Photoshop Creating Navigation
- Create Panels
- Images - Dithering
- Images - Halos or Artifacts
- Photoshop
- Photoshop Links
- PhotoShop Links
- Photoshop CS4 Screen Layout
- Photoshop - Backup Layer
- Photoshop Channels
- Photoshop - Creating a Curve
- Photoshop Hue, Saturation and Lightness
- Photoshop - Making Brushes
- Photoshop Masks
- Photoshop - Load Brushes
- Photoshop Color Table
- Photoshop Feathering
- Photoshop Patterns
- photoshop_tutorials.txt
- Photoshop Posterization
- Creating a Web Design
Notice: Undefined variable: message in /hermes/walnacweb03/walnacweb03af/b1896/as.asaferco/webdesign/WebTools/Photoshop/photoshop_feather.html on line 251
Photoshop Feathering
- Open Adobe Photoshop. This example is done using Photoshop CS4.
- Open an image. (Example Image - open file and save to your flash drive)
- Back up the original layer.
- Use the marquee tool to select a section of the image.
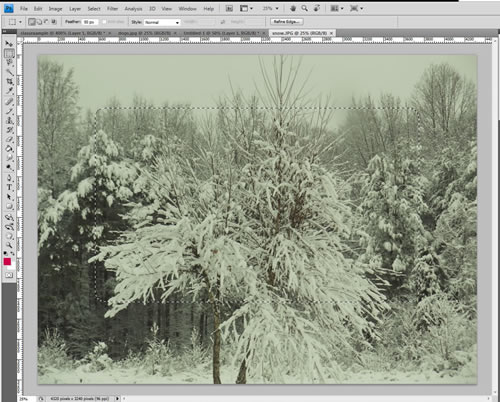
- Notice the Tool Options bar. Since this is a very large image. You can see the image size in the Info Bar or Status Bar at the bottom. If you don't see the image dimensions, click on the black triangle to see the other options.
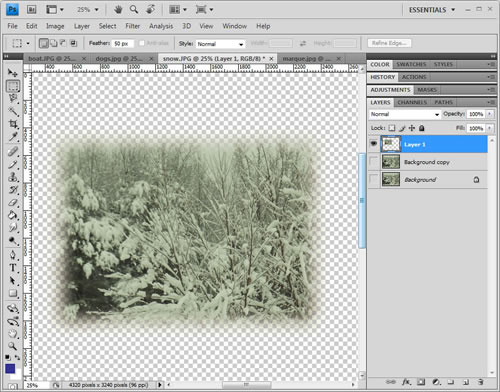
- Ctrl c to copy the selected area.
- Ctrl-Shift-n to create a new layer.
- Select the new layer in the layer panel.
- Ctrl v to paste the selection to the new layer.
- Make sure that the Background copy and the Background are not visible
and you should see the image feathered.
Warning: Use of undefined constant PHP_SELF - assumed 'PHP_SELF' (this will throw an Error in a future version of PHP) in /hermes/walnacweb03/walnacweb03af/b1896/as.asaferco/webdesign/WebTools/Photoshop/photoshop_feather.html on line 283
Page last updated: May 31, 2012 15:11 PM
It is all about:
Content and Navigation...
Content and Navigation...