
.jpg)
.jpg)
.jpg)
NOTE: This is a collection of information and links collected over the years that might provide useful information. A Safer Company LLC does not guarantee, endorse or approve any of these links or their scripts. Use these links to other websites at your own risk.
Notice: Undefined variable: message in /hermes/walnacweb03/walnacweb03af/b1896/as.asaferco/webdesign/Templates/code/dir_listing_enhanced.php on line 67
Notice: Undefined variable: message in /hermes/walnacweb03/walnacweb03af/b1896/as.asaferco/webdesign/Templates/code/dir_listing_enhanced.php on line 72
Warning: Use of undefined constant r - assumed 'r' (this will throw an Error in a future version of PHP) in /hermes/walnacweb03/walnacweb03af/b1896/as.asaferco/code/F_get_page_title_Enh.php on line 28
Notice: Undefined variable: print_file_data in /hermes/walnacweb03/walnacweb03af/b1896/as.asaferco/webdesign/Templates/code/dir_listing_enhanced.php on line 127
Warning: Use of undefined constant r - assumed 'r' (this will throw an Error in a future version of PHP) in /hermes/walnacweb03/walnacweb03af/b1896/as.asaferco/code/F_get_page_title_Enh.php on line 28
Warning: Use of undefined constant r - assumed 'r' (this will throw an Error in a future version of PHP) in /hermes/walnacweb03/walnacweb03af/b1896/as.asaferco/code/F_get_page_title_Enh.php on line 28
Warning: Use of undefined constant r - assumed 'r' (this will throw an Error in a future version of PHP) in /hermes/walnacweb03/walnacweb03af/b1896/as.asaferco/code/F_get_page_title_Enh.php on line 28
Warning: Use of undefined constant r - assumed 'r' (this will throw an Error in a future version of PHP) in /hermes/walnacweb03/walnacweb03af/b1896/as.asaferco/code/F_get_page_title_Enh.php on line 28
Warning: Use of undefined constant r - assumed 'r' (this will throw an Error in a future version of PHP) in /hermes/walnacweb03/walnacweb03af/b1896/as.asaferco/code/F_get_page_title_Enh.php on line 28
Warning: Use of undefined constant r - assumed 'r' (this will throw an Error in a future version of PHP) in /hermes/walnacweb03/walnacweb03af/b1896/as.asaferco/code/F_get_page_title_Enh.php on line 28
Warning: Use of undefined constant r - assumed 'r' (this will throw an Error in a future version of PHP) in /hermes/walnacweb03/walnacweb03af/b1896/as.asaferco/code/F_get_page_title_Enh.php on line 28
Warning: Use of undefined constant r - assumed 'r' (this will throw an Error in a future version of PHP) in /hermes/walnacweb03/walnacweb03af/b1896/as.asaferco/code/F_get_page_title_Enh.php on line 28
Warning: Use of undefined constant r - assumed 'r' (this will throw an Error in a future version of PHP) in /hermes/walnacweb03/walnacweb03af/b1896/as.asaferco/code/F_get_page_title_Enh.php on line 28
Warning: Use of undefined constant r - assumed 'r' (this will throw an Error in a future version of PHP) in /hermes/walnacweb03/walnacweb03af/b1896/as.asaferco/code/F_get_page_title_Enh.php on line 28
Warning: Use of undefined constant r - assumed 'r' (this will throw an Error in a future version of PHP) in /hermes/walnacweb03/walnacweb03af/b1896/as.asaferco/code/F_get_page_title_Enh.php on line 28
Warning: Use of undefined constant r - assumed 'r' (this will throw an Error in a future version of PHP) in /hermes/walnacweb03/walnacweb03af/b1896/as.asaferco/code/F_get_page_title_Enh.php on line 28
Warning: Use of undefined constant r - assumed 'r' (this will throw an Error in a future version of PHP) in /hermes/walnacweb03/walnacweb03af/b1896/as.asaferco/code/F_get_page_title_Enh.php on line 28
Warning: Use of undefined constant r - assumed 'r' (this will throw an Error in a future version of PHP) in /hermes/walnacweb03/walnacweb03af/b1896/as.asaferco/code/F_get_page_title_Enh.php on line 28
Warning: Use of undefined constant r - assumed 'r' (this will throw an Error in a future version of PHP) in /hermes/walnacweb03/walnacweb03af/b1896/as.asaferco/code/F_get_page_title_Enh.php on line 28
Warning: Use of undefined constant r - assumed 'r' (this will throw an Error in a future version of PHP) in /hermes/walnacweb03/walnacweb03af/b1896/as.asaferco/code/F_get_page_title_Enh.php on line 28
Warning: Use of undefined constant r - assumed 'r' (this will throw an Error in a future version of PHP) in /hermes/walnacweb03/walnacweb03af/b1896/as.asaferco/code/F_get_page_title_Enh.php on line 28
Warning: Use of undefined constant r - assumed 'r' (this will throw an Error in a future version of PHP) in /hermes/walnacweb03/walnacweb03af/b1896/as.asaferco/code/F_get_page_title_Enh.php on line 28
Warning: Use of undefined constant r - assumed 'r' (this will throw an Error in a future version of PHP) in /hermes/walnacweb03/walnacweb03af/b1896/as.asaferco/code/F_get_page_title_Enh.php on line 28
Warning: Use of undefined constant r - assumed 'r' (this will throw an Error in a future version of PHP) in /hermes/walnacweb03/walnacweb03af/b1896/as.asaferco/code/F_get_page_title_Enh.php on line 28
Warning: Use of undefined constant r - assumed 'r' (this will throw an Error in a future version of PHP) in /hermes/walnacweb03/walnacweb03af/b1896/as.asaferco/code/F_get_page_title_Enh.php on line 28
Warning: Use of undefined constant r - assumed 'r' (this will throw an Error in a future version of PHP) in /hermes/walnacweb03/walnacweb03af/b1896/as.asaferco/code/F_get_page_title_Enh.php on line 28
Warning: Use of undefined constant r - assumed 'r' (this will throw an Error in a future version of PHP) in /hermes/walnacweb03/walnacweb03af/b1896/as.asaferco/code/F_get_page_title_Enh.php on line 28
Notice: Undefined variable: print_folder_data in /hermes/walnacweb03/walnacweb03af/b1896/as.asaferco/webdesign/Templates/code/dir_listing_enhanced.php on line 160
Notice: Undefined variable: message in /hermes/walnacweb03/walnacweb03af/b1896/as.asaferco/webdesign/Templates/code/WebDesign_toc.php on line 12
- Photoshop Draw curves with the Pen Tool
- Creating a Search Button
- Create a Website Page Layout
- Photoshop Creating a Logo
- Photoshop Creating Navigation
- Create Panels
- Images - Dithering
- Images - Halos or Artifacts
- Photoshop
- Photoshop Links
- PhotoShop Links
- Photoshop CS4 Screen Layout
- Photoshop - Backup Layer
- Photoshop Channels
- Photoshop - Creating a Curve
- Photoshop Hue, Saturation and Lightness
- Photoshop - Making Brushes
- Photoshop Masks
- Photoshop - Load Brushes
- Photoshop Color Table
- Photoshop Feathering
- Photoshop Patterns
- photoshop_tutorials.txt
- Photoshop Posterization
- Creating a Web Design
Notice: Undefined variable: message in /hermes/walnacweb03/walnacweb03af/b1896/as.asaferco/webdesign/WebTools/Photoshop/photoshop_Curves.html on line 247
- Make a point
- Click-and-hold at where you think the top of the curve should be, then hold the shift key and drag out to the side of the point to create curve handles. Holding shift constrains the curve handles so that they are horizontal.
- Click-and-hold at where you think the bottom part of the curve should be
- Hold the shift key and drag.
5. Click to end the curve.
6. To create the shape that we’ll later fill in, hold the Shift key (to constrain the movement to vertical/horizontal/45 degree angles) and click to create the bottom right corner of the shape.
7. Holding shift still, click to create the bottom left corner of the shape.
8. Finally, bring your cursor back to the beginning point and click to close the shape.
9. In the Paths palette, Ctrl-click the path layer (Command-click for Macs) to make a selection from the path. (Skip this step in Illustrator.)
10. Use the gradient tool to fill the shape.

Here’s a one-minute “web page layout” that I made using this technique:
Photoshop - Creating a Curve
Curves can be used to create interesting images that can be used in logos, web page headers or button backgrounds.
Creating a Curves with the Freeform Pen Tool
- Open Adobe Photoshop and make a new image Ctrl+n.
- Hold
down on the Pen tool , and select Freeform Pen
 .
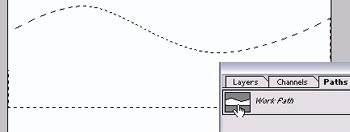
. - Make sure
you have the "Paths" option at the top left of
the screen selected

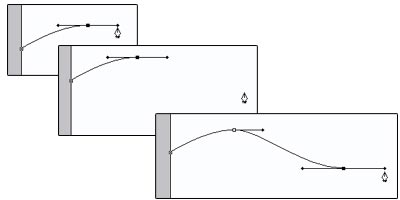
- Draw a small line.
- Hold down Ctrl:
- drag the right point to the right side of the canvas
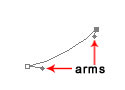
- drag the arms to make the line into a curve

- Drag the arms away from the points to make the curves more gradual.
- To see outside the canvas, you may need to maximize the window you're working in
- Zoom
out (Ctrl -).
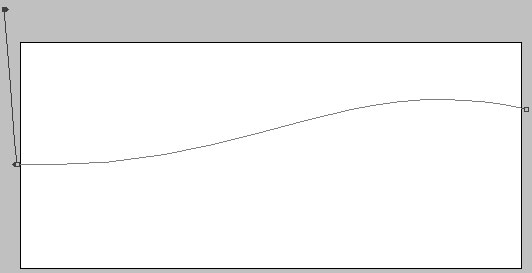
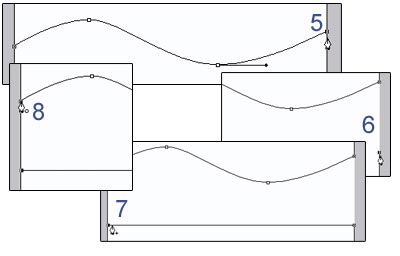
3 – Extending the Path
- Create a complete shape or encloser with the Freeform Pen tool.
- Without pressing Ctrl, click on the line just next to the leftmost point. This will create a new point.
- Drag the leftmost point
up above the top of the image as shown.
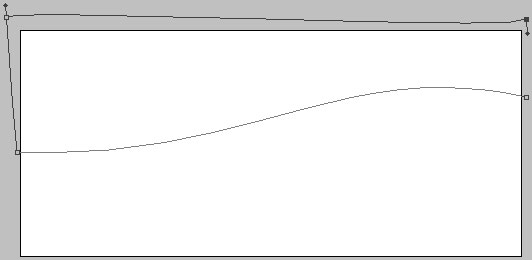
4 – Creating a full circuit -
Repeat the process, by clicking just below your highest point, to make a
new point and then moving your highest point way over to the right.

- Creating a selection and filling it with the Paint Bucket
- Right click a part of the line that's inside your image.
- Click Make Selection.
- This connects the last point on your line to the first point. (In Adobe Photoshop 5.0, you may have to right-click again and click Turn off Path, to make the line go away. In Adobe Photoshop 6.0 and Adobe Photoshop 7.0, it's automatic.)
- Make a new layer, select a color, click on the Paint Bucket tool,
and fill the selected area.

- 6 – Creating a shadow and bevel
- Right click on your layer, and select effects (Adobe Photoshop 5.0) or Blending Options (Adobe Photoshop 6.0 and Adobe Photoshop 7.0). Give the layer a Shadow and an Inner Bevel.
Warning: Use of undefined constant PHP_SELF - assumed 'PHP_SELF' (this will throw an Error in a future version of PHP) in /hermes/walnacweb03/walnacweb03af/b1896/as.asaferco/webdesign/WebTools/Photoshop/photoshop_Curves.html on line 347
Page last updated: June 01, 2012 12:56 PM
Content and Navigation...