
.jpg)
.jpg)
.jpg)
NOTE: This is a collection of information and links collected over the years that might provide useful information. A Safer Company LLC does not guarantee, endorse or approve any of these links or their scripts. Use these links to other websites at your own risk.
Notice: Undefined variable: message in /hermes/walnacweb03/walnacweb03af/b1896/as.asaferco/webdesign/Templates/code/dir_listing_enhanced.php on line 67
Notice: Undefined variable: message in /hermes/walnacweb03/walnacweb03af/b1896/as.asaferco/webdesign/Templates/code/dir_listing_enhanced.php on line 72
Warning: Use of undefined constant r - assumed 'r' (this will throw an Error in a future version of PHP) in /hermes/walnacweb03/walnacweb03af/b1896/as.asaferco/code/F_get_page_title_Enh.php on line 28
Notice: Undefined variable: print_folder_data in /hermes/walnacweb03/walnacweb03af/b1896/as.asaferco/webdesign/Templates/code/dir_listing_enhanced.php on line 111
Warning: Use of undefined constant r - assumed 'r' (this will throw an Error in a future version of PHP) in /hermes/walnacweb03/walnacweb03af/b1896/as.asaferco/code/F_get_page_title_Enh.php on line 28
Warning: Use of undefined constant r - assumed 'r' (this will throw an Error in a future version of PHP) in /hermes/walnacweb03/walnacweb03af/b1896/as.asaferco/code/F_get_page_title_Enh.php on line 28
Notice: Undefined variable: print_file_data in /hermes/walnacweb03/walnacweb03af/b1896/as.asaferco/webdesign/Templates/code/dir_listing_enhanced.php on line 127
Warning: Use of undefined constant r - assumed 'r' (this will throw an Error in a future version of PHP) in /hermes/walnacweb03/walnacweb03af/b1896/as.asaferco/code/F_get_page_title_Enh.php on line 28
Warning: Use of undefined constant r - assumed 'r' (this will throw an Error in a future version of PHP) in /hermes/walnacweb03/walnacweb03af/b1896/as.asaferco/code/F_get_page_title_Enh.php on line 28
Warning: Use of undefined constant r - assumed 'r' (this will throw an Error in a future version of PHP) in /hermes/walnacweb03/walnacweb03af/b1896/as.asaferco/code/F_get_page_title_Enh.php on line 28
Warning: Use of undefined constant r - assumed 'r' (this will throw an Error in a future version of PHP) in /hermes/walnacweb03/walnacweb03af/b1896/as.asaferco/code/F_get_page_title_Enh.php on line 28
Warning: Use of undefined constant r - assumed 'r' (this will throw an Error in a future version of PHP) in /hermes/walnacweb03/walnacweb03af/b1896/as.asaferco/code/F_get_page_title_Enh.php on line 28
Warning: Use of undefined constant r - assumed 'r' (this will throw an Error in a future version of PHP) in /hermes/walnacweb03/walnacweb03af/b1896/as.asaferco/code/F_get_page_title_Enh.php on line 28
Warning: Use of undefined constant r - assumed 'r' (this will throw an Error in a future version of PHP) in /hermes/walnacweb03/walnacweb03af/b1896/as.asaferco/code/F_get_page_title_Enh.php on line 28
Warning: Use of undefined constant r - assumed 'r' (this will throw an Error in a future version of PHP) in /hermes/walnacweb03/walnacweb03af/b1896/as.asaferco/code/F_get_page_title_Enh.php on line 28
Warning: Use of undefined constant r - assumed 'r' (this will throw an Error in a future version of PHP) in /hermes/walnacweb03/walnacweb03af/b1896/as.asaferco/code/F_get_page_title_Enh.php on line 28
Warning: Use of undefined constant r - assumed 'r' (this will throw an Error in a future version of PHP) in /hermes/walnacweb03/walnacweb03af/b1896/as.asaferco/code/F_get_page_title_Enh.php on line 28
Notice: Undefined variable: message in /hermes/walnacweb03/walnacweb03af/b1896/as.asaferco/webdesign/Templates/code/WebDesign_toc.php on line 12

Notice: Undefined variable: message in /hermes/walnacweb03/walnacweb03af/b1896/as.asaferco/webdesign/4_Physical_Design/Coding_HTML/HTML_Table_to_CSS.html on line 247
Steps for Moving from Table to CSS Structure
There are several examples that I have designed to be used by my students. The code can be saved and used by students as a learning tool.
Step 1: Getting the HTML Code
Step 2: Changing the HTML
Getting the HTML Code
It is better to use the browser Firefox than Internet Explorer. IE is not very nice to the code; for example: it will capitalize the tags and remove ending semicolons (;) from the end of CSS lines.
Firefox Setup
- If you do not have Mozilla Firefox on your computer, Download Firefox.
- Open the Firefox browser.
- Make sure you are viewing this page in Firefox. If you are not using Firefox, copy and paste the URL into Firefox.
File Structure
- You should already have the basic file structure set up. All of the files
for your website should go in the website folder.
WEB210/website
Getting the Files
- We are using Firefox for getting basic code so you do not have to spend
time typing and can focus on the structure. This page has the basic layout
of any web page set up using a HTML
table. If you do not know how to set up a HTML table, you should review
the HTML table tags. You must understand the basic table elements and
properties before
you go further:
- <table>
- <tr>
- <td>
- <th>
- colspan - property
- Open the Web Page structured with tables page in Firefox.
- Go to the top menu bar and select File>Save Page As...
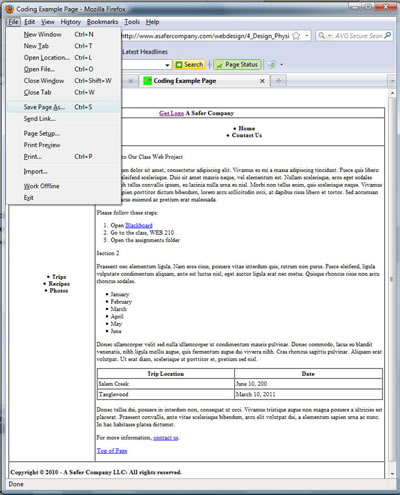
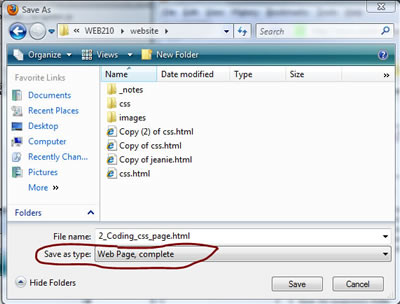
- Save the page in your folder WEB210/website as 2_Coding_css_page.html. Make
sure that Save as type is Web Page, complete (the default)
NOTE: you should see the other folders and files that you have already created in class.
- There are a couple of important links.
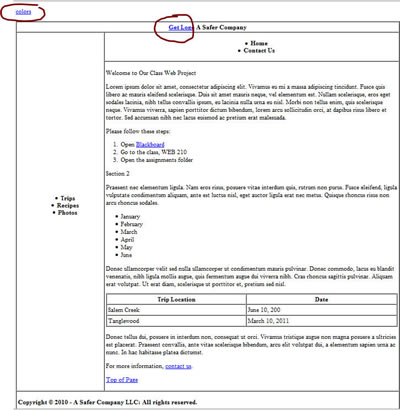
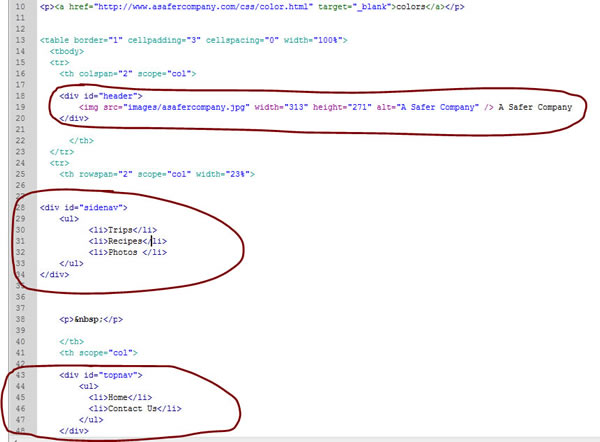
- colors - located at the top of the page. This links to the colors.html file where I have stored my hexadecimal colors that we plan to use on our web page. (Remember your Assignment about colors) - Open this file
- Get
Logo - located at the top of the page. This links to the asafercompany.jpg
file. Images for websites can come from many places; files on your camera,
files on your computer or flash drive. It is important to understand
how to save files to your website and to be able to add the image to
your web page.
Always make sure you are not using copyrighted images.- You need to open this link to see the A Safer Man
- Right click on the image:
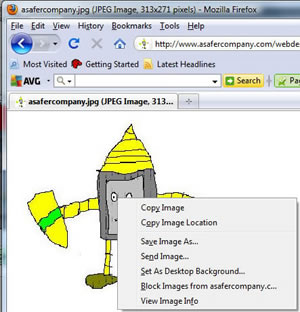
- Select Save Image As...
- Save this file to yourWEB210/website/images/ folder.
NOTE: If you did this exercise in class, you may already have this file.
Changing the HTML
Now that we have the base HTML code, we can start making changes. To change the HTML code, you will need an editor. We have been using Dreamweaver in class but you can use any editor like NotePad++, etc. Editors
Adding Images
On the web page, replace the words Get Logo with the image named asafercompany.jpg
Organizing the HTML Code
You want to make sure that your HTML code is organized to make it easier for YOU to read. The browser does not care if the code is all on one line but you want to make sure you have plenty of white space around your HTML code to make it easier for you to read.
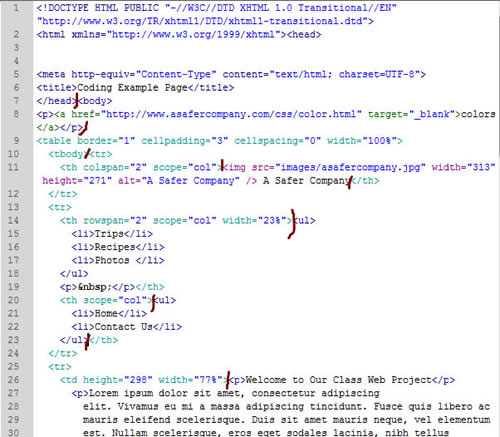
- Open the file 2_Coding_css_page.html in either Dreamweaver or a text editor and look at the source code. You do not have to use Dreamweaver.
- The format of the source code should look good if you download the file using Firefox. The HTML tags should be lower case and you should still see indented lines.
- I've marked several places where you should add several blank lines to
make the code easier for you to read.
For example:
- Line 7: between the </head> and <body> tags
- Line 9: before the <table tag
- You should also put blank lines around the different sections of the
page:
For example: header, navigation, content and footer areas.
- Line 11: before the image tag - This is the image in the header area
- Line 11: after the company name - This is the company name in the header area
- Line 14: between <th rowspan="2" scope="col" width="23%"> and the <ul> - The ul starts the unordered list for the navigation section.
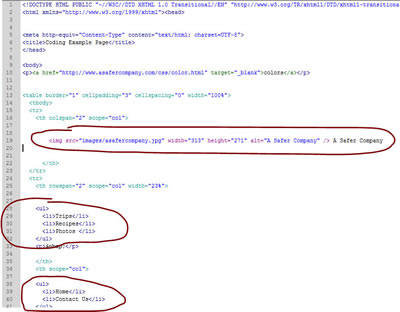
- Go through all of the HTML code and add blank lines. Make sure that you
do not delete any HTML code.
Notice that I have isolated the code for the different sections of the web page (header, navigation, top navigation, etc)
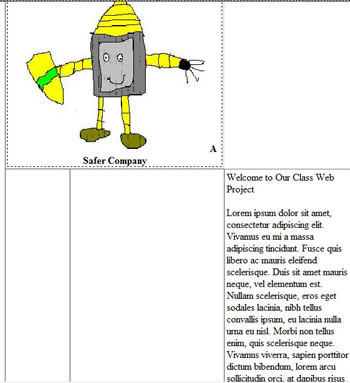
- Make sure that you do not delete any HTML code. View your file in Design view
or in the browser. It should look exactly like it did before
you made
any changes. For
example: The image below shows the header area has shifted to the
left. This is because I deleted some of the tags for the table. Your file
should look exactly like it did in Getting the
Files # 2 above; NOT like the image below.
- If you have gotten this far and everything looks exactly like it did in Getting the Files # 2 above, save your file and you should be good to continue; otherwise you should go back to Getting the Files and save the file from the website and try again.
Adding Divisions
Using tables is an easy and fast way to structure a web page but it is not the best way. Good web pages use CSS to structure the page.
Our next step is to wrap div tags around each section of the web page. To keep everyone together, we will name our id's as follow:
- header
- sidenav
- topnav
- content
- footer
- Go to the source code for 2_Coding_css_page.html.
- Find the code for the the header
section at the top of the page. Make sure that you do not
include any of the table tags.
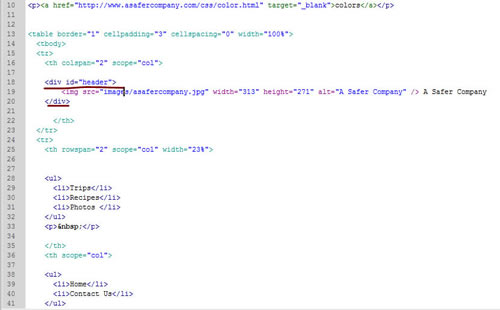
- Add the tag <div id="header"> to the start of this section.
- Add the closing </div> tag to the end of this section:
- For example: Notice that in
Line 18: I added the opening div tag
Line 21: I added the closing tag.
I also added some blank lines and indented to make it easier to read. Your code should look like my code.
- Go through the rest of the code and wrap the div tag around the remaining
sections. For example: in the image above:
Line 28 through Line 32 is the unordered list for the sidenav division.
Add <div id="sidenav"> before line 28.
Add </div> after line 32 above. - View your file in Design view or in the browser. If everything looks exactly like it did in Getting the Files # 2 above, save your file and you should be good to continue; otherwise you probably go back to Getting the Files and save the file from the website and try again.
Removing the Table Structure
- At this point you should have plenty of white space around your divisions
- We will be using our divisions and CSS to control the look of each section
of the web page; therefore we will not be relying on the table structure.
Note: There is a small table in the content area that contains trip information. Tables can be used to format information in the content area but should not be used for the structure of the page. - It is time to delete the table tags. This would be a good time to make
a backup copy of the page before you continue.
- In Dreamweaver, you can select the file you want to copy in the Files panel, and <Ctrl> c to copy and <Ctrl> v to paste. Make sure you see the backup file: Copy of 2_Coding_css_page.html
- If not using Dreamweaver, go to Windows explorer and copy the file.
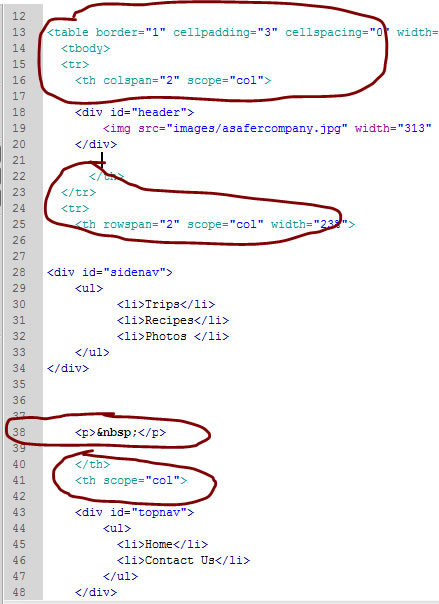
- Look at your code and find the table tags. For example:
Lines: 13 - 16
Lines: 22 - 25
Line 38: This line is a <p> tag and the is a nonbreaking space and it can be removed.
Lines: 40 - 41
The line at the top: <p><a href="http://www.asafercompany.com/css/color.html" target="_blank">colors</a></p> was used to get the colors and it can be deleted.
Make sure you remove all of the table tags.
- After you delete the table structure, your code should look like:
Note: I collapsed the content section in Line 31 so everything would be displayed in the same image.
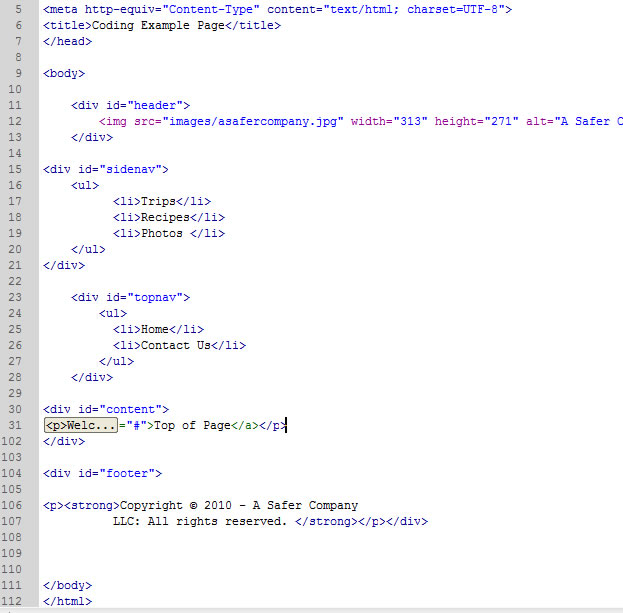
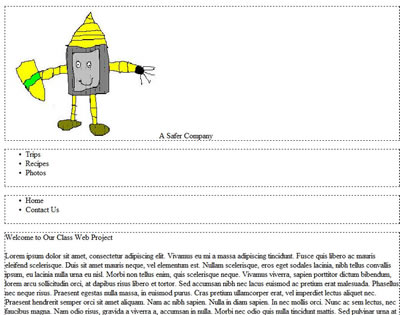
- View your file in Dreamweaver Design view or in the browser.
It does not look the same way it did before. There is no structure to the
page. One division comes right after the next division.
- If everything looks exactly like the image above, save your file and you should be good to continue; otherwise remember the backup copy you made above? Copy your backup copy and start Removing the Table Structure and try again.
Warning: Use of undefined constant PHP_SELF - assumed 'PHP_SELF' (this will throw an Error in a future version of PHP) in /hermes/walnacweb03/walnacweb03af/b1896/as.asaferco/webdesign/4_Physical_Design/Coding_HTML/HTML_Table_to_CSS.html on line 535
Page last updated: May 31, 2012 14:28 PM
Content and Navigation...